Контуры — это просто границы объектов на изображении. Их можно использовать для различных задач, таких как обнаружение объектов, сегментация изображений, анализ формы и многое другое. OpenCV предоставляет функции для поиска контуров внутри изображения и управления ими. Вот базовый пример работы с контурами в OpenCV:
import cv2
import numpy as np

# Read the input image
image = cv2.imread('input_image.jpg')
gray = cv2.cvtColor(image, cv2.COLOR_BGR2GRAY)

# Apply thresholding to create a binary image
ret, threshold = cv2.threshold(gray, 127, 255, cv2.THRESH_BINARY)

# Find contours in the binary image
contours, hierarchy = cv2.findContours(threshold, cv2.RETR_EXTERNAL, cv2.CHAIN_APPROX_SIMPLE)

# Create a copy of the original image for drawing contours
contour_image = image.copy()

# Draw contours on the contour image
cv2.drawContours(contour_image, contours, -1, (0, 255, 0), 2)

# Display the contour image
cv2.imshow('Contours', contour_image)

cv2.waitKey(0)
cv2.destroyAllWindows()
В этом примере:
- Мы читаем входное изображение и преобразуем его в оттенки серого.
- Мы применяем пороговую обработку для создания бинарного изображения, в котором интересующие объекты белые, а фон черный.
- Мы используем функцию
cv2.findContours()для поиска контуров в бинарном изображении. Функция возвращает список контуров и иерархию вложенных контуров (которая в этом простом примере не используется). - Мы создаем копию исходного изображения для рисования контуров.
- Мы используем
cv2.drawContours()для рисования обнаруженных контуров на скопированном изображении. Аргумент-1указывает на рисование всех контуров,(0, 255, 0)задает цвет (зеленый), а2— толщину контурных линий.
Настройте код в соответствии с вашими конкретными требованиями и характеристиками входного изображения. Возможно, вам придется предварительно обработать изображение по-другому, настроить пороговые значения или выполнить дальнейшие операции с обнаруженными контурами.
Еще один фрагмент кода с дополнительными разъяснениями…
"""
# Image Contours helps in shape Detection, Analyzation and Recognition.
# contours is just like a curve which is made by continous data. and this depends on the color or its intensity.
# In Simple words, (it is simply a curve joining all continous points which is having same color or intensity).
# Accepts gray Scale image.
# findContour() manipulate original image, so copy it before proceeding.
# findContour() is like finding white object from black background. so better be change the image accordingly.
# Contour Features:-
# Moments, Contour Area, Contour Perimeter, Contour approximation , Convexhull, Checking convexity, Bounding Rectangle(Straight boundary Rectangle, Rotated Rectangle), Minimum enclosing circle, Fitting an Ellipse, Fitting a line,
# Contour retrieval Mode
# RETR_LIST = it simply retrieves all the contours and store in the list.
# RETR_EXTERNAL = You can use this mode if you want to extract only the outer contours. It might be useful in some cases.
# RETR_CCOMP =This mode retrieves all the contours and arranges them to a 2-level hierarchy. ie external contours of the
# object (ie its boundary) are placed in hierarchy-1. And the contours of holes inside object (if any) is placed in hierarchy-2
# RETR_TREE =  It retrieves all the contours and creates a full family hierarchy list.


import cv2
import numpy as np

img = cv2.imread("C:\\Users\\RANGER\\Desktop\\Z7.jpg")
img = cv2.resize(img,(600,600))
img1 = cv2.cvtColor(img,cv2.COLOR_BGR2GRAY)
img1 = cv2.resize(img1,(600,600))

ret,thresh = cv2.threshold(img1,63,255,0)

# detecting contours after after thresholding image...
# cnts(coordinate),hier(hierarchy) = findcontour(img,contour_retrival_mode,method)
# this function return list containing coordinates of founded contours and ech contour is an array of x,y and heirarchy
cnts, hier = cv2.findContours(thresh,cv2.RETR_TREE,cv2.CHAIN_APPROX_SIMPLE)

print(cnts,len(cnts))

# draw Contours
# drawcontour(img,cnts, id of contour, color, thickness) # here if we draw contour just pass -1
img = cv2.drawContours(img,cnts,-1,(25,100,15),4)
# as you can see in the ouput dialog, there are 61 contour in this image if you want to perform on some specific number of contours.
# then write the number at -1(number should be between 0 number of contours.)
# img = cv2.drawContours(img,cnts,36,(25,100,15),4)

#output
cv2.imshow("Originals --",img)
cv2.imshow("GrayScale--",img1)
cv2.imshow("Threshold--",thresh)


cv2.waitKey(0)
cv2.destroyAllWindows()
"""


################################################
# Contour and its functions
# Moment - Moment detect the functionality of the objects.it also return you the center points of the objects


import cv2
#import numpy as np

img = cv2.imread("C:\\Users\\RANGER\\Desktop\\Z7.jpg")
img = cv2.resize(img,(600,700))
img1 = cv2.cvtColor(img,cv2.COLOR_BGR2GRAY)
ret,thresh = cv2.threshold(img1,120,255,cv2.THRESH_BINARY_INV)

# Findcontour(img,contour_retrival_mode,method)
cnts, hier= cv2.findContours(thresh,cv2.RETR_TREE, cv2.CHAIN_APPROX_SIMPLE)

print("Number of Contours==",cnts ,"\n total contour ==",len(cnts))
print("Heirarchy ",hier)

# loop over Contours(img, cnts, -1,(10,20,100),4)
for c in cnts:  # Loop to reach every contours for moment operation.
    #compute the center of the contour
    #an image moment is a certain particular weighted average(moment)
    M = cv2.moments(c)    # passing all contours one by one into moment function
    print("M==",M)
    cX = int(M["m10"] / M["m00"]) # formula for finding x_coordinates
    cY = int(M["m01"] / M["m00"]) # formula for finding y_coordinates

    # draw the contour and center of the shape on the image
    cv2.drawContours(img,[c],-1,(0,255,0),2) # drawing contours
    cv2.circle(img,(cX,cY),1,(255,255,255),2) # drawing circle just as shape
    cv2.putText(img, "center",(cX - 20, cY -20),cv2.FONT_HERSHEY_SIMPLEX,0.5,(255,255,255),2) #getting center and print also on the object.
    # parameter (img,"text",font,fontsize, (color parameter (255,255,255), 2, cv.LINE_AA))

#output
cv2.imshow("Original ",img)
cv2.imshow("gray",img1)
cv2.imshow("Thresh",thresh)

cv2.waitKey(0)
cv2.destroyAllWindows()

"""
# Contour and its functions
# Moment - Moment detect the functionality of the objects.it also return you the center points of the objects
# Apprroximation

import cv2
import numpy as np

img = cv2.imread("C:\\Users\\RANGER\\Desktop\\Z7.jpg")
img = cv2.resize(img,(600,700))
img1 = cv2.cvtColor(img,cv2.COLOR_BGR2GRAY)
ret,thresh = cv2.threshold(img1,120,255,cv2.THRESH_BINARY_INV)

# Findcontour(img,contour_retrival_mode,method)
cnts, hier= cv2.findContours(thresh,cv2.RETR_TREE, cv2.CHAIN_APPROX_SIMPLE)

print("Number of Contours==",cnts ,"\n total contour ==",len(cnts))
print("Heirarchy ",hier)

area1 = []
# loop over Contours(img, cnts, -1,(10,20,100),4)
for c in cnts:  # Loop to reach every contours for moment operation.
    #compute the center of the contour
    #an image moment is a certain particular weighted average(moment)
    M = cv2.moments(c)    # passing all contours one by one into moment function
    print("M==",M)
    # you can extract useful data like area, centroid etc. Centroid is given by the relations, Cx=M10/M00 and Cy=M01/M00.
    cX = int(M["m10"]/M["m00"]) # formula for finding x_coordinates
    cY = int(M["m01"]/M["m00"]) # formula for finding y_coordinates

    #Finding Area of contour
    area = cv2.contourArea(c)
    area1.append(area)

    #Contour approx - It is use to approx shape with less number of vertices
    epsilon = 0.1 * cv2.arcLength(c,True) # arc length take contour and return it as small size as it can.
    # Note: the more small size of contour, the more good result will come.
    # 0.1 is a random value. but it shouldn't be more than 1.
    # arclength() returns the parameter of contour
    data = cv2.approxPolyDP(c,epsilon, True)
    # then passing epsilon to polygon shape dp. Because polygon has multiple sides.
    # passed contour with True value, which will pass the value to data. other wise it will not pass to store data in data variable.

    # Convexhull is used to provide proper contours convexity
    # in other word, whatever area detected by contour which will be bounded with the help of convexHull() is called convexHull.
    # whatever area covered by object with what shape, will be convexity..
    hull = cv2.convexHull(data)

    # we are just creating bounded rectangle which will cover the whole image..
    x,y,w,h = cv2.boundingRect(hull)
    img = cv2.rectangle(img,(x,y), (x+w,y+h),(125,10,20),5)

    # draw the contour and center of the shape on the image
    cv2.drawContours(img,[c],-1,(0,255,0),2) # drawing contours
    cv2.circle(img,(cX,cY),7,(255,255,255),-1) # drawing circle just as shape
    cv2.putText(img, "center",(cX - 20, cY -20),cv2.FONT_HERSHEY_SIMPLEX,0.5,(255,255,255),2) #getting center and print also on the object.
    # parameter (img,"text",font,fontsize, (color parameter (255,255,255), 2, cv.LINE_AA))

#output
cv2.imshow("Original ",img)
cv2.imshow("gray",img1)
cv2.imshow("Thresh",thresh)

cv2.waitKey(0)
cv2.destroyAllWindows()
"""
Что такое аппроксимация, выпуклая оболочка на самом деле?
Сначала просмотрите этот фрагмент кода. Он содержит четкое определение новых тем.
#Contours -
###############################################################################################################
#Contours can be explained simply as a curve joining all the continuous points
#(along the boundary), having same color or intensity.
#The contours are a useful tool for shape analysis and object detection and recognition
#For better accuracy, use binary images and also apply edge detection before
#findig countours.
#findCountour function manipulate original imge so copy it before proceeding.
#findContour is like finding white object from black background.
#so you must turn image in white and background is black.
#We have to find and draw contours as per the requirement
# Image Contours helps in shape Detection, Analyzation and Recognition.
# contours is just like a curve which is made by continous data. and this depends on the color or its intensity.
# In Simple words, (it is simply a curve joining all continous points which is having same color or intensity).
# Accepts gray Scale image.
# findContour() manipulate original image, so copy it before proceeding.
# findContour() is like finding white object from black background. so better be change the image accordingly.
# Contour Features:-
# Moments, Contour Area, Contour Perimeter, Contour approximation , Convexhull, Checking convexity, Bounding Rectangle(Straight boundary Rectangle, Rotated Rectangle), Minimum enclosing circle, Fitting an Ellipse, Fitting a line,
# Contour retrieval Mode
# RETR_LIST = it simply retrieves all the contours and store in the list.
# RETR_EXTERNAL = You can use this mode if you want to extract only the outer contours. It might be useful in some cases.
# RETR_CCOMP =This mode retrieves all the contours and arranges them to a 2-level hierarchy. ie external contours of the
# object (ie its boundary) are placed in hierarchy-1. And the contours of holes inside object (if any) is placed in hierarchy-2
# RETR_TREE = It retrieves all the contours and creates a full family hierarchy list.
############################################################################################################################
"""
# Sample program to find contours..
import cv2
import numpy as np
img = cv2.imread("C:\\Users\\RANGER\\Desktop\\Z7.jpg")
img = cv2.resize(img,(600,700))
img1 = cv2.cvtColor(img,cv2.COLOR_BGR2GRAY)
ret,thresh = cv2.threshold(img1,220,255,cv2.THRESH_BINARY_INV)
#findcontour(img,contour_retrival_mode,method)
# detecting contours after after thresholding image...
# cnts(coordinate),hier(hierarchy) = findcontour(img,contour_retrival_mode,method)
# this function return list containing coordinates of founded contours and ech contour is an array of x,y and heirarchy
cnts,hier = cv2.findContours(thresh,cv2.RETR_TREE,cv2.CHAIN_APPROX_SIMPLE)
#Here cnts is a list of contours. ANd each contour is an array with x, y cordinate
#hier variable called hierarchy and it contain image information.
print("Number of contour==",cnts,"\ntotal contour==",len(cnts))
print("Hierarchy==\n",hier)
# loop over the contours
for c in cnts:
# compute the center of the contour
#an image moment is a certain particular weighted average (moment) of the image pixels
M = cv2.moments(c)
print("M==",M)
# These are nothing but the formula to find the x and y coordinate
# # you can extract useful data like area, centroid etc. Centroid is given by the relations, Cx=M10/M00 and Cy=M01/M00.
cX = int(M["m10"] / M["m00"])
cY = int(M["m01"] / M["m00"])
# draw the contour and center of the shape on the image
cv2.drawContours(img, [c], -1, (0, 255, 0), 2)
cv2.circle(img, (cX, cY), 7, (255, 255, 255), -1)
cv2.putText(img, "center", (cX - 20, cY - 20),cv2.FONT_HERSHEY_SIMPLEX, 0.5, (255, 255, 255), 2)
cv2.imshow("original===",img)
cv2.imshow("gray==",img1)
cv2.imshow("thresh==",thresh)
cv2.waitKey(0)
cv2.destroyAllWindows()
"""
"""
############################################################################################################################################
#-------------Contour Area , Approximation and Convex hull
# Program ---- 2
#Find countour area , aprroximation and convex hull
img = cv2.imread("C:\\Users\\RANGER\\Desktop\\Z7.jpg")
img = cv2.resize(img,(600,700))
img1 = cv2.cvtColor(img,cv2.COLOR_BGR2GRAY)
ret,thresh = cv2.threshold(img1,220,255,cv2.THRESH_BINARY_INV)
#findcontour(img,contour_retrival_mode,method)
cnts,hier = cv2.findContours(thresh,cv2.RETR_TREE,cv2.CHAIN_APPROX_SIMPLE)
#Here cnts is a list of contours. ANd each contour is an array with x, y cordinate
#hier variable called hierarchy and it contain image information.
print("Number of contour==",cnts,"\ntotal contour==",len(cnts))
#print("Hierarchy==\n",hier)
area1 = []
# loop over the contours
for c in cnts:
# compute the center of the contour
#an image moment is a certain particular weighted average (moment) of the image pixels
M = cv2.moments(c)
#print("M==",M)
cX = int(M["m10"] / M["m00"])
cY = int(M["m01"] / M["m00"])
#find area of contour
area = cv2.contourArea(c)
area1.append(area)
if area<10000:
#contour Approx - it is use to approx shape with less number of vertices
epsilon = 0.1*cv2.arcLength(c,True) #arc lenght take contour and return its perimeter
data= cv2.approxPolyDP(c,epsilon,True)
#Convexhull is used to provide proper contours convexity.
hull = cv2.convexHull(data)
x,y,w,h = cv2.boundingRect(hull)
img = cv2.rectangle(img,(x,y),(x+w,y+h),(125,10,20),5)
# draw the contour and center of the shape on the image
cv2.drawContours(img, [c], -1, (50, 100, 50), 2)
cv2.circle(img, (cX, cY), 7, (255, 255, 255), -1)
cv2.putText(img, "center", (cX - 20, cY - 20),
cv2.FONT_HERSHEY_SIMPLEX, 0.5, (255, 255, 255), 2)
cv2.imshow("original===",img)
cv2.imshow("gray==",img1)
cv2.imshow("thresh==",thresh)
cv2.waitKey(0)
cv2.destroyAllWindows()
"""
####################################################################################################################################
# Program --- 3
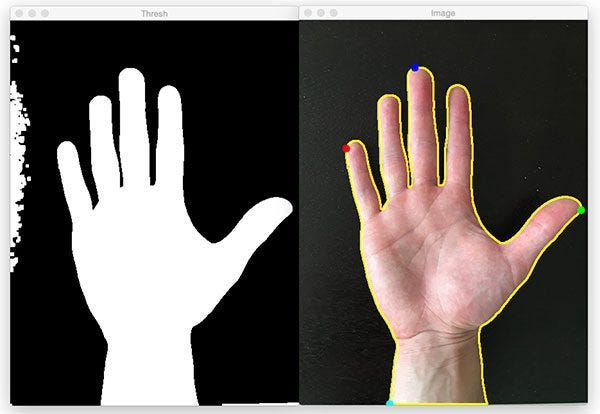
# find contours in an image of hand show convexity
# Convexhull is nothing but the whole area where all contours exists.
import cv2
img = cv2.imread("C:\\Users\\RANGER\\Desktop\\hand.jpg")
img = cv2.resize(img,(600,700))
img1 = cv2.cvtColor(img,cv2.COLOR_BGR2GRAY)
# when performing threshold after that too we are not getting clear view and noiseless image. yes there are still some dot marks and noises.
# so we will clean it manually
blur = cv2.medianBlur(img1,5)
ret,thresh = cv2.threshold(blur,240,255,cv2.THRESH_BINARY_INV)
#findcontour (img,contour_retrieval_mode, method)
cnts, hier = cv2.findContours(thresh, cv2.RETR_EXTERNAL, cv2.CHAIN_APPROX_SIMPLE)
# Draw the contours
#cv2.drawContours(img,cnts,-1,(50,50,150),2) # here -1 means draw all contours from image.
# convexHull...
for c in cnts:
epsilon = 0.0001* cv2.arcLength(c,True) #
data = cv2.approxPolyDP(c,epsilon,True)
hull = cv2.convexHull(data)
cv2.drawContours(img, [c], -1 ,(50,50,150),2)
cv2.drawContours(img, [hull], -1 ,(0,255,0),2)
# Convexity Effect
hull2 = cv2.convexHull(cnts[0],returnPoints = False) # hull2 will store the coordinates when returnpoints= False.
# defect returns an array which contain value [start_point, end_point, far point, approximation points]
defect = cv2.convexityDefects(cnts[0], hull2)
for i in range(defect.shape[0]):
s,e,f,d = defect[i,0]
print(s,e,f,d)
start = tuple(c[s][0])
end = tuple(c[e][0])
far = tuple(c[f][0])
# cv2.line(img, start, end, [255,0,0],2)
cv2.circle(img, far, 5,[0,0,255],-1)
# Extreme Points
#it means topmost, bottommost, rightmost, leftmost point of the object.
c_max = max(cnts, key=cv2.contourArea)
#determine the most extreme points along the contour
extLeft = tuple(c_max[c_max[:, :, 0].argmin()][0])
extRight = tuple(c_max[c_max[:, :, 0].argmin()][0])
extTop = tuple(c_max[c_max[:, :, 1].argmin()][0])
extButtom = tuple(c_max[c_max[:, :,1].argmin()][0])
# draw the ouline of the object then draw each of the extreme points, where the left most is red, right-most is green, top-most is blue, and buttom most is teal.
cv2.circle(img,extLeft,8,(255,0,255),-1)#pink
cv2.circle(img,extRight,8,(0,125,255),-1)#brown
cv2.circle(img,extTop,8,(255,10,0),-1)#blue
cv2.circle(img,extButtom,8,(19,152,152),-1)#green
cv2.imshow("Original==",img)
cv2.imshow("gray== ",img1)
cv2.imshow("Threshold= ",thresh)
cv2.waitKey(0)
В OpenCV выпуклая оболочка является фундаментальной концепцией, используемой в обработке изображений и компьютерном зрении. Выпуклая оболочка набора точек — это наименьший выпуклый многоугольник, охватывающий все точки набора. Выпуклую оболочку можно использовать для различных задач, таких как анализ формы, обнаружение объектов и многое другое.

OpenCV предоставляет функцию cv2.convexHull(), которая вычисляет выпуклую оболочку набора точек или вершин контура.
Теперь посмотрите на этот простой пример контурной выпуклой оболочки…
import cv2
import numpy as np

# Read the input image
image = cv2.imread('input_image.jpg')
gray = cv2.cvtColor(image, cv2.COLOR_BGR2GRAY)

# Apply thresholding to create a binary image
ret, threshold = cv2.threshold(gray, 127, 255, cv2.THRESH_BINARY)

# Find contours in the binary image
contours, hierarchy = cv2.findContours(threshold, cv2.RETR_EXTERNAL, cv2.CHAIN_APPROX_SIMPLE)

# Get the largest contour (you can choose a different one based on your needs)
largest_contour = max(contours, key=cv2.contourArea)

# Calculate the convex hull of the largest contour
convex_hull = cv2.convexHull(largest_contour)

# Create a copy of the original image for drawing the convex hull
convex_hull_image = image.copy()

# Draw the convex hull on the image
cv2.drawContours(convex_hull_image, [convex_hull], -1, (0, 255, 0), 2)

# Display the convex hull image
cv2.imshow('Convex Hull', convex_hull_image)

cv2.waitKey(0)
cv2.destroyAllWindows()
В этом примере:
- Мы читаем входное изображение и преобразуем его в оттенки серого.
- Мы применяем пороговую обработку для создания двоичного изображения.
- Находим контуры на бинарном изображении.
- Мы получаем самый большой контур, используя
max()иcv2.contourArea(). - Мы вычисляем выпуклую оболочку наибольшего контура с помощью
cv2.convexHull(). - Мы создаем копию исходного изображения, на которой будем рисовать выпуклую оболочку.
- Мы используем
cv2.drawContours(), чтобы нарисовать выпуклую оболочку скопированного изображения.
Имейте в виду, что вы можете настроить критерии выбора контура и параметры рисования в зависимости от вашего конкретного варианта использования и требований.